
Create the shape

We start by creating a circle. Select the Ellipse Shape tool (L). Hold down Shift key while dragging. Turn on Smart Guides, go to View > Smart Guides or hit command/control + u. Make sure your Rulers are turned on. Go to View > Show Rulers or hit command/control + r. Drag a horizontal guide from the top Ruler to the middle of the circle. Select the Rotation tool and click in the center of the circle to set the rotation point. Rotate the circle 45°. While dragging hold down Shift key so the rotation snaps to 45°. With Smart Guides turned on you should also be able to see when you’ve turned the circle 45°. Select the Direct Selection tool (white arrow) and select the path segment on the right of the circle. Hit the delete key.
Now select the Pen Tool and click in the top right point of the circle where you have just deleted the segment of the path to redraw this part as shown above in the image on the left. Hold down the Shift Key and click somewhere on the guide so you draw a perfect 45° line. Click in the bottom right point of the circle shape (that now looks more like a drop of water laying on its side) to close the path.

Add Linear Gradient Mask
Now select the Rectangle tool (M) and draw a rectangle on top of the shape as shown in the image on the right above.

Give the rectangle a linear gradient fill, going from white to black at an angle of 0°. Now select both the drop shape and the rectangle. Go to the Transparency palette and select Make Opacity Mask from the palette’s drop-down menu as shown in the image above. You should see the drop shape filled with a gradient as shown in the image below.

Select the mask thumbnail in the Transparency palette. Now you are in the Mask mode. Select the rectangle and select the Gradient tool from the toolbox. Redraw the linear gradient so the fill of the shape goes from 100% to 0% opacity from one end to the other. Click on the left of the shape, hold down Shift key and drag towards the other end on the right of the shape. The end point where you release is where you’ll have 100% transparency. Leave the mask mode by clicking on the image thumbnail in the Transparency palette.

Grab the layer in the Layers palette and drag it onto the Create New Layer icon at the bottom of the palette to duplcicate the layer.
Duplicate and change color

Select the Rotation tool from the toolbox and click somewhere on the top right of the shape to define your rotation point. Hold down the Shift key while rotating the duplicated shape 180°.

Make the size of the shape slightly smaller (using the shape’s handlers and the shift key to keep the exact proportion) and move the shape in position and give it a slightly different fill as shown above. Create a new layer and move it below the layer holding the shapes. Draw a rectangle the size of your document. Give it a suitable fill that serves as background. I used a dark background with subtle radial gradient fill. Lock the background layer (click in the square space next to the eye icon in the layers palette).
Build a ‘pile’ of shapes

Repeat the previous steps (Duplicate and change color) to create a pile of shapes as shown in the image above. Group the shapes, hit command/control + g.
Group in a Layer Set and add a Radial Gradient Mask
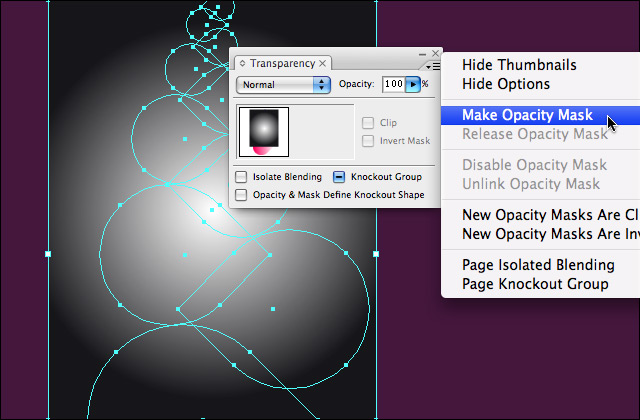
Select the layer that holds the pile of shapes. Draw a rectangle on top and give it a radial gradient fill from white in the center to black. Select both shapes and rectangle. Just like before, go to the Transparency palette and select Make Opacity Mask from the palette’s drop-down menu as shown in the image above. To edit the masking effect you click the mask thumbnail in the Transparency palette. To leave mask mode you click the image thumbnail.
Duplicate the ‘pile’, rotate and re-color
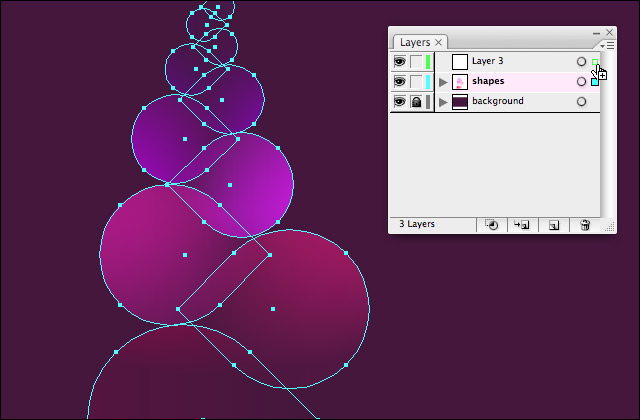
Create a new layer by clicking the Create New Layer icon at the bottom of the Layers palette. Duplicate the shapes into the new layer by clicking on the layer that holds the shapes and dragging the colored square at the right while holding down the option/alt key. You should see a plus sign as shown in the image above, indicating you are duplicating the selection of objects. Rotate the shapes in the new layer by 180° and select shape per shape using the Direct Selection tool (white arrow) and change the color of each shape. To edit the mask if needed you can go into mask mode by clicking the mask thumbnail in the Transparency palette.
Finalizing

You play around with the layer mode and choose Lighten for example and add some text to finish it off.
Different result

While this is possible to do in both applications, I still prefer Photoshop for this creation. I believe you have a bit more freedom and options in Photoshop. First of all there are more layer modes to play with and secondly you have more freedom for the masking. You can use a brush to reveal or hide certain areas for example. As for the layer modes I get the feeling the end result is a bit different as well. In Photoshop I also use Lighten, but had to set the layer to 50% transparency. In Illustrator even at 100% the effect isn’t that dramatic and vivid in color. The big advantage of using Illustrator is the fact that everything is vector-based, which gives you the flexibility to scale your design at any size and still have the best quality. The choice is I believe a matter of comparing the pros and cons in combination with your personal preference.