

Final Product What You’ll Be Creating

Step 1
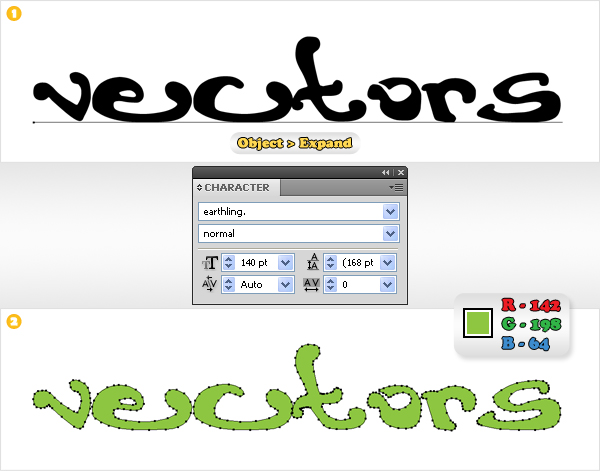
First, download the Earthling font and move in your Fonts directory. Now, open Illustrator, create a 700px by 300px document and pick the Type Tool (T). Click on your Artboard, enter your text and go to Object > Expand. Select the resulting group of shapes and fill them with R=142, G=198, B=64.
Step 2
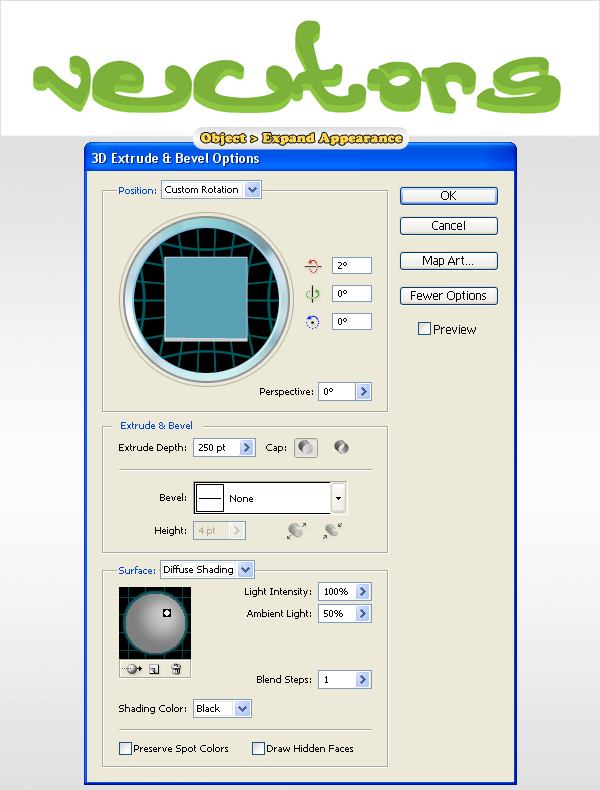
Select the group made in the previous step and go to Effect > 3D > Extrude & Bevel. Click on the More Options button, enter all the data shown below, click OK then go to Object > Expand Appearance.
Step 3
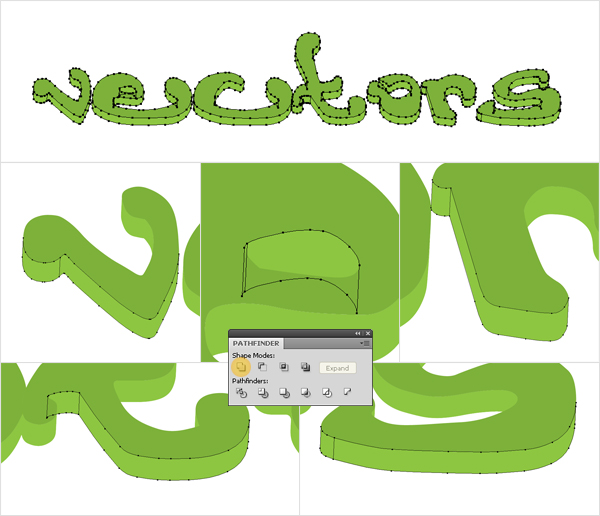
Drill down in the group and subgroups created in the previous steps. First, delete all the Clipping Paths then use the Unite button from their Pathfinder panel to unite some of these shapes.
Step 4
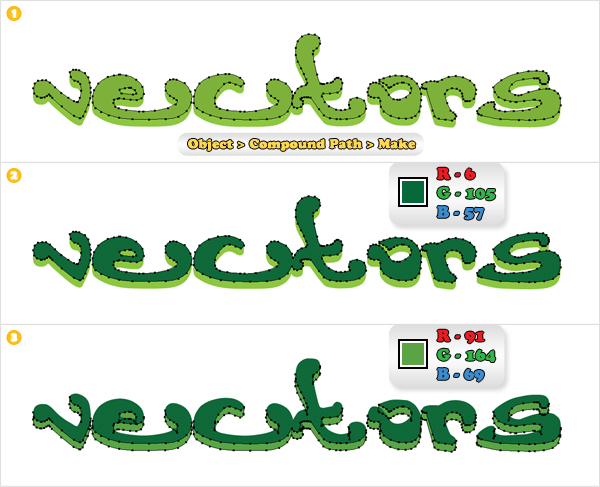
Select all the top, letter shapes and go to Object > Compound Path > Make. Fill the resulting path with R=6, G=105, B=57, then Bring it to Front (Shift + Command + Right Bracket key). Double-click on it (in the Layers panel) and name it “vectors.” Select the rest of the shapes and replace the fill color with R=91, G=164, B=69.
Step 5
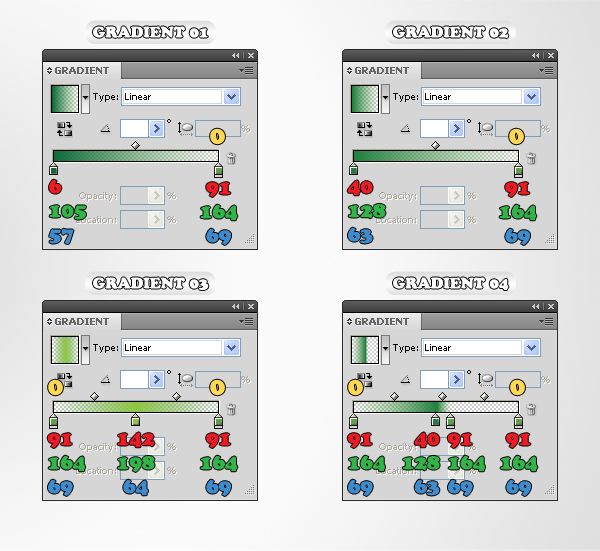
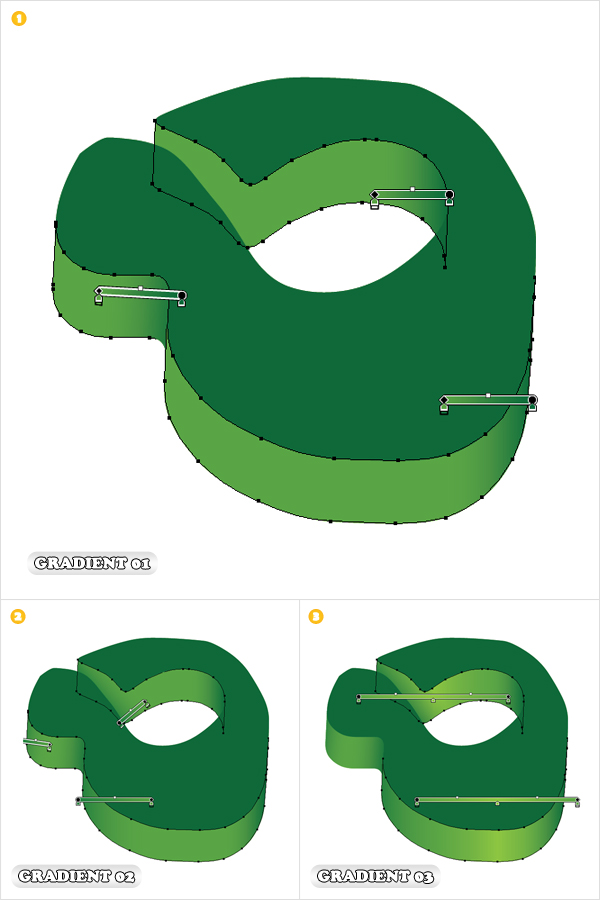
Open the Gradient and the Swatches panel. Create the four gradients shown below and save them in your Swatches panel. Name them from “1″ to “4″ as shown in the following steps. Take a closer look at the gradient and you’ll notice some yellow text above some of the gradient sliders. It stands for Opacity.
Step 6
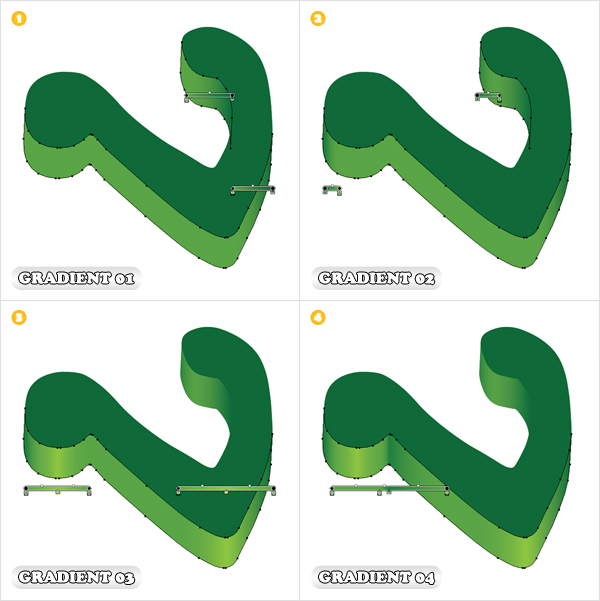
Let’s focus on the “v” shapes. Ignore the top letter shape and focus on the other two. Select the top shape, open the fly-out menu of the Appearance panel and click on Add New Fill. This should add a second fill for the selected shape.
Select this new fill, and use “Gradient 01,” as shown below. Select the bottom shape, add a new fill, and use the same gradient as shown in the first image. Add a third fill for each of these shapes and use “Gradient 02.” Select the bottom shape, add two new fills and use “Gradient 03,” as shown in the third image. Add one final fill for the bottom shape and use “Gradient 04.”
Step 7
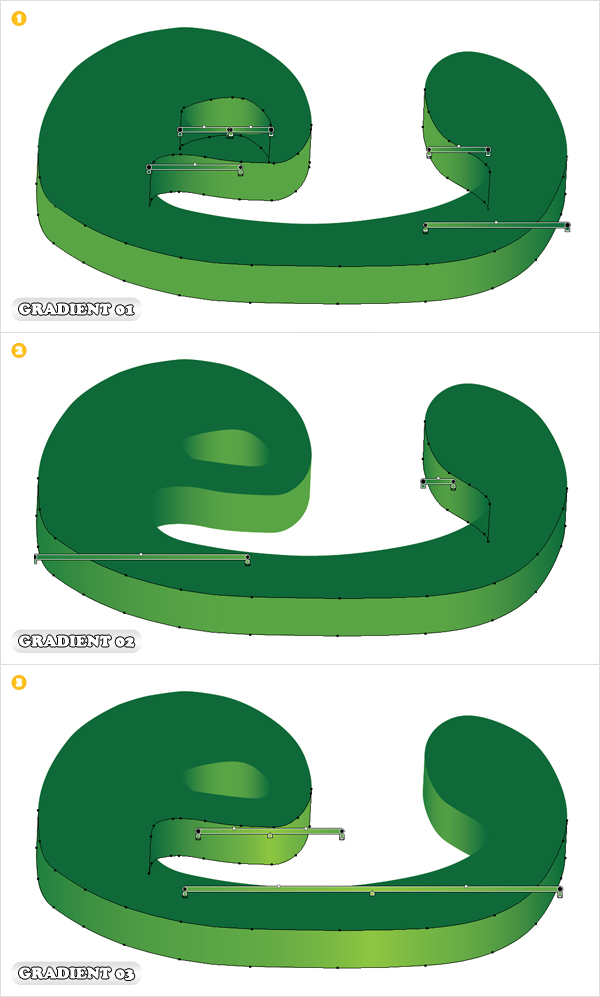
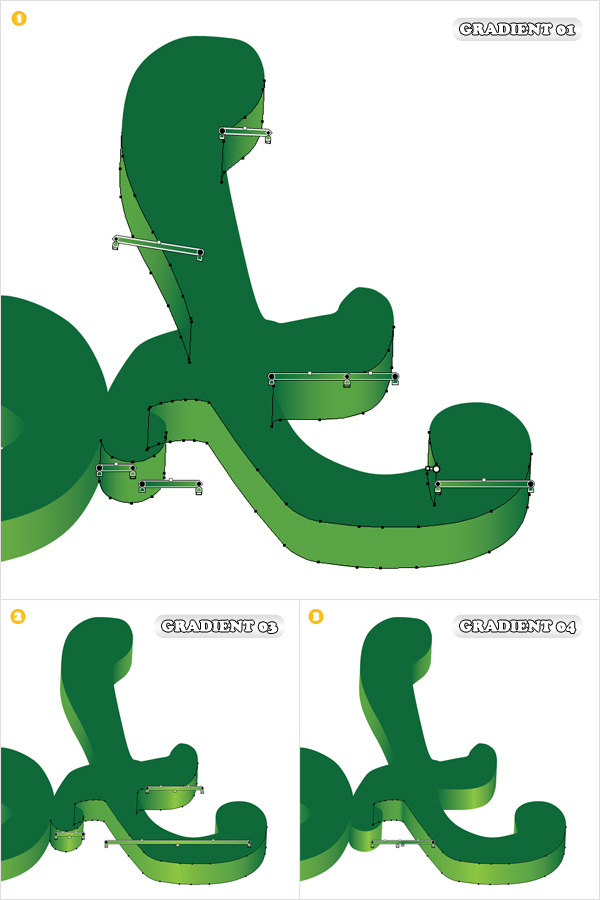
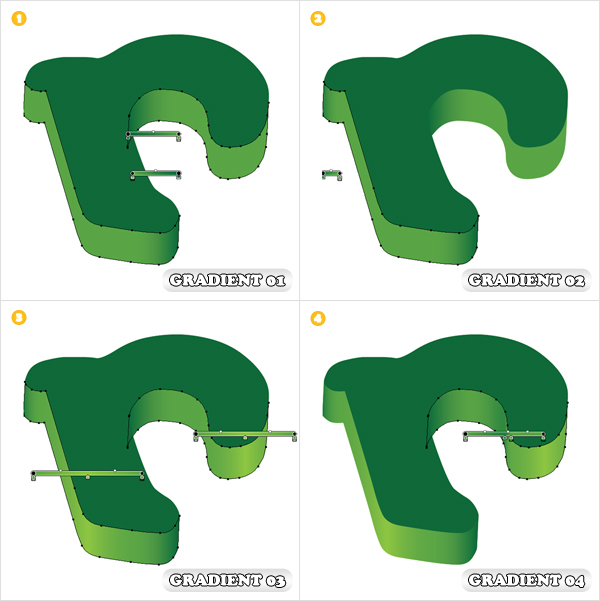
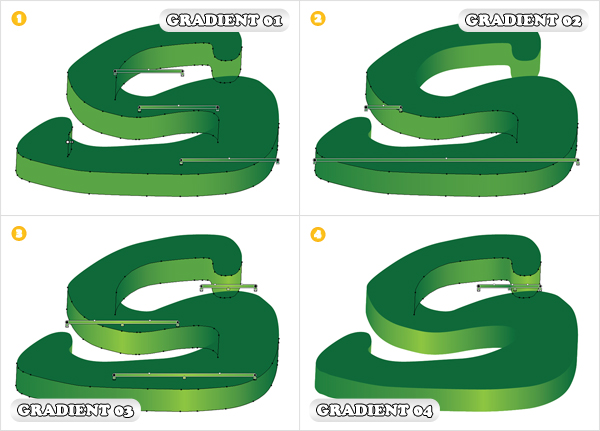
Now that you understand how to work with multiple fills, use the same gradients for the rest of the shapes, as shown in the following images. Finally, select all these shapes and group them (Command + G).

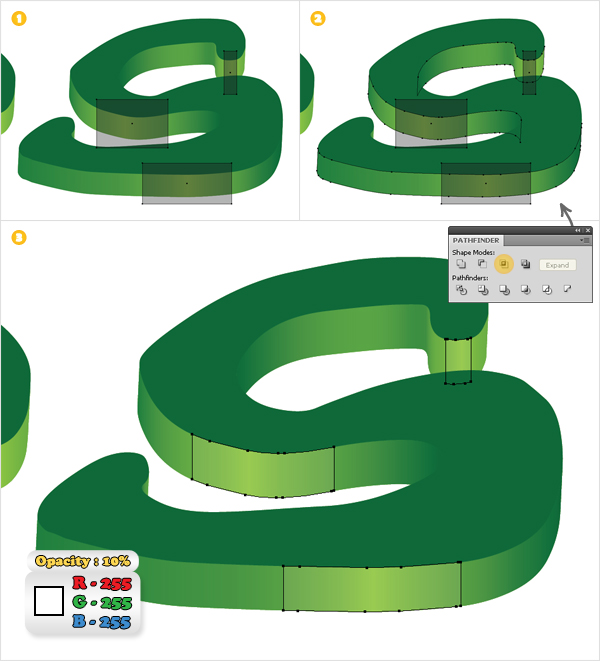
Step 8
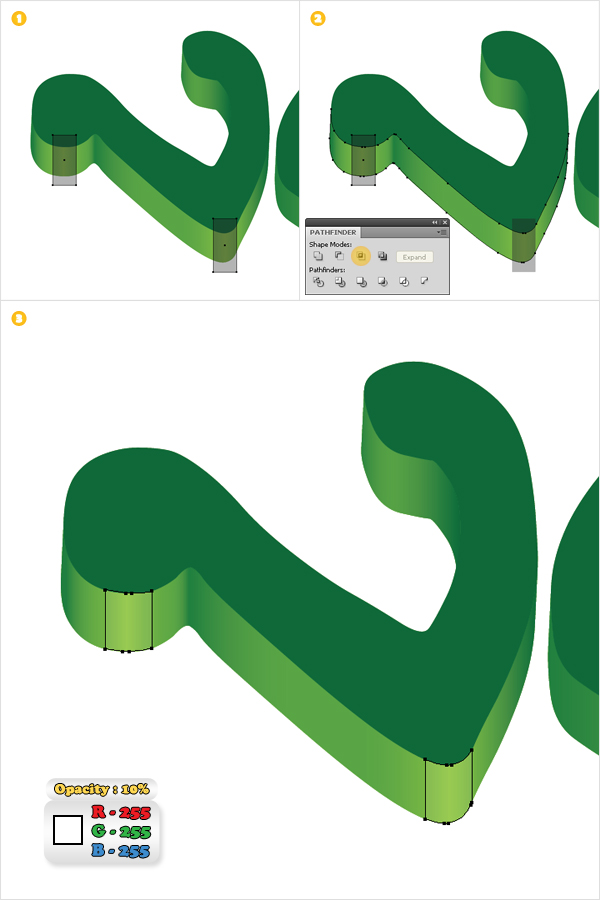
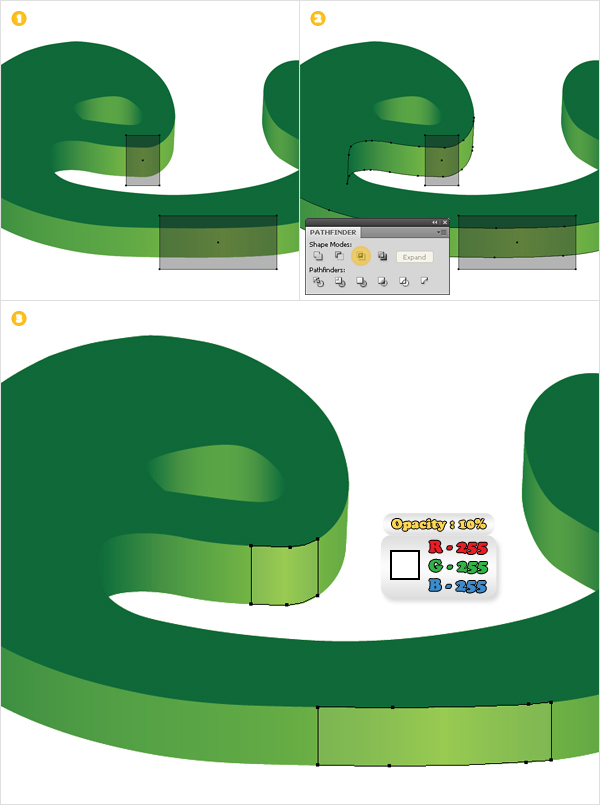
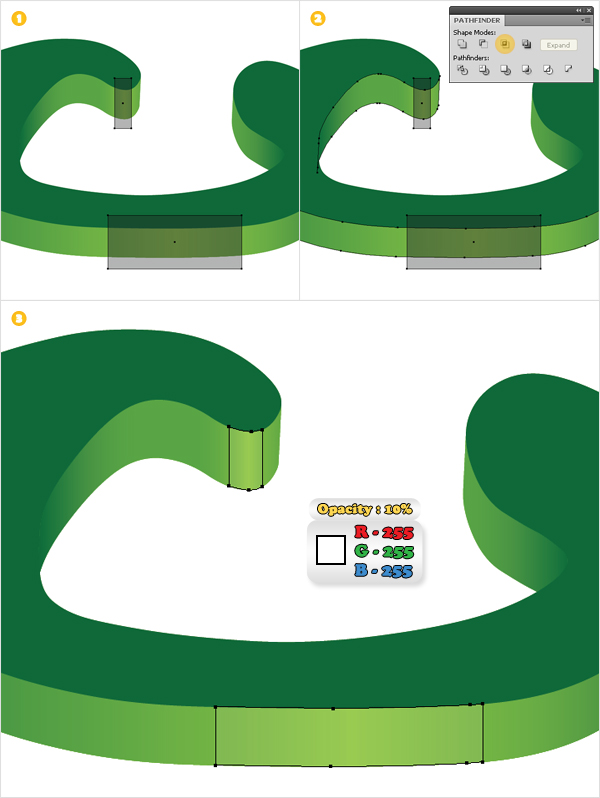
Return to the “v” shapes. In this step, we’ll see some discrete detail. First, create two copies of the bottom shape, then pick the Rectangle Tool(M) and create two rectangles as shown in the first images. Select each of these shapes along with one of the copies and click on the Intersect button from the Pathfinder panel. Fill both shapes with white and lower their opacity to 10%.
Step 9
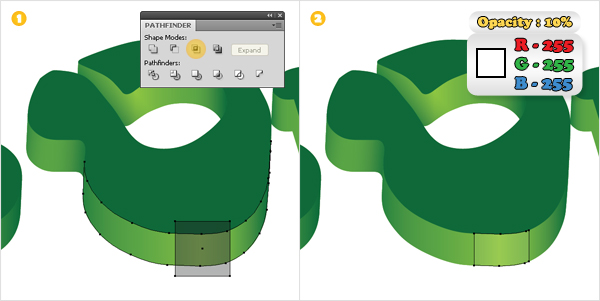
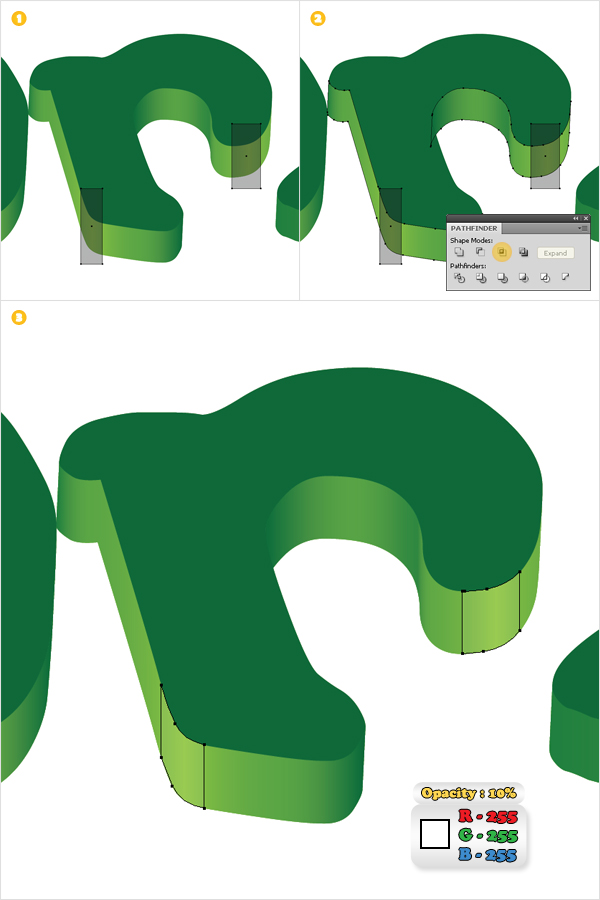
Repeat the same techniques for the rest of the shapes. Notice that these fresh rectangles must be places above the lightest areas (where “Gradient 03″ is applied). Finally, select all these white shapes and group them (Command + G).

Step 10
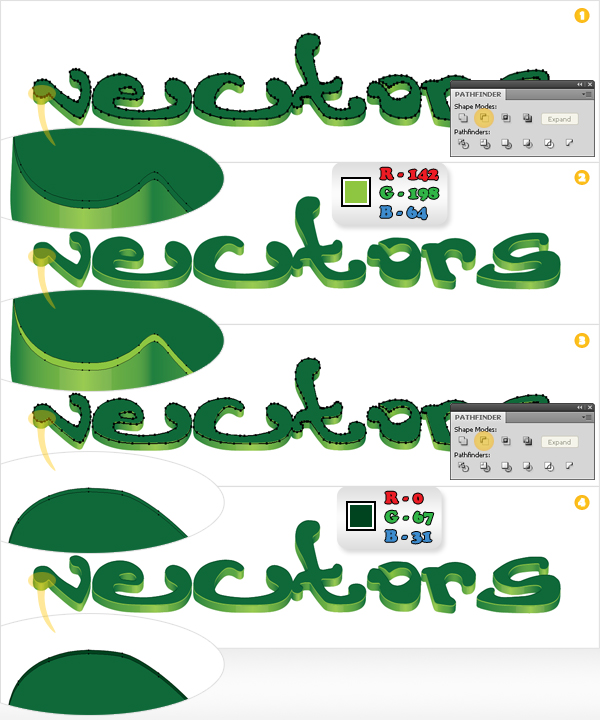
Now, let’s focus on the “vectors” shape. Select it and make two copies (Command + C > Command + F). Go to Edit > Preferences > General and enter “1″ in the Keyboard Increment box. Select the top copy and hit the up arrow once (to move it 1px up). Reselect both copies and click on the Minus Front button from the Pathfinder panel.
Fill the resulting shapes with R=142, G=198, B=64. Reselect the vectors shape and make another two copies. Go to Edit > Preferences > General and enter “0,5″ in the Keyboard Increment box. Select the top copy and hit the down arrow once (to move it 0,5px down). Reselect both copies and click on the Minus Front button from the Pathfinder panel. Fill the resulting shapes with R=0, G=67, B=31.
Step 11
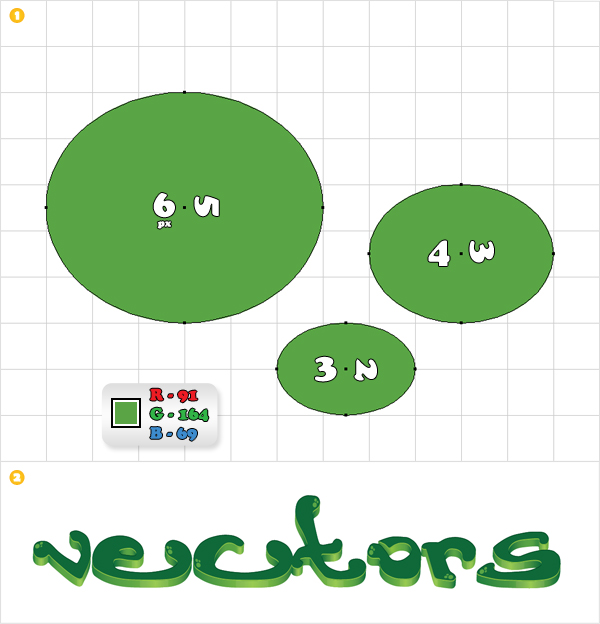
For the following step you’ll need a grid every 1px. First, turn on the Grid (View > Grid) and the Snap to Grid (View > Snap to Grid), then go to Edit > Preferences > Guides & Grid. Enter “1″ in the “Gridline every” and “Subdivisions” boxes, then click OK. Now, pick the Ellipse Tool (L) and create three squeezed circles (a 6×5 px, a 4×3 px, and a 3×2 px shape) and place them as shown in the following image.
Fill them with R=91, G=164, B=69 then group them (Command + G). Disable the Grid and the Snap to Grid, then make several copies of this group and spread them over the text as shown in the second image.
Step 12
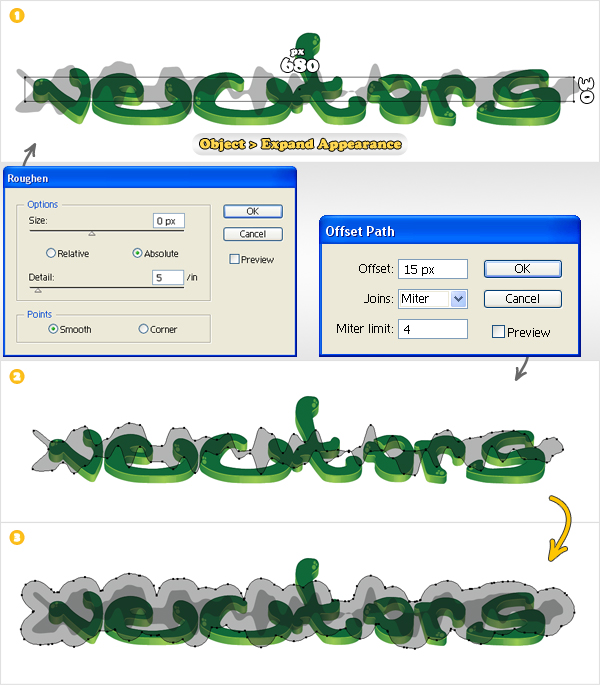
Pick the Rectangle Tool (M), create a 680 by 30px shape and place it as shown in the following image. Select it and go to Effect > Distort & Transform > Roughen. Enter the data shown below, click OK, then go to Object > Expand Appearance. Select the resulting shape and go to Object > Path > Offset Path. Enter a 15px Offset and click OK.
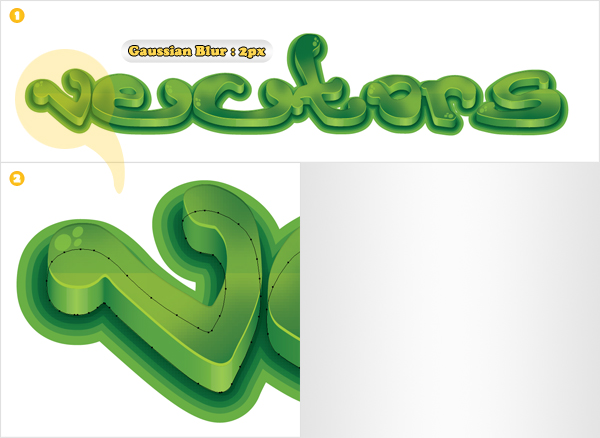
Step 13
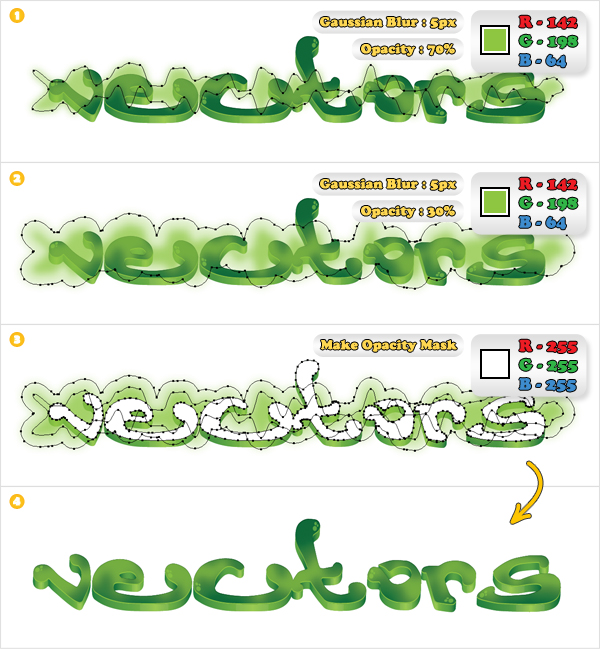
Now, let’s add some color for the shapes made in the previous steps. Select the smaller one, fill it with R=142, G=198, B=64 , lower its Opacity to 70%, then go to Effect > Blur > Gaussian Blur. Enter a 5px Radius and click OK. Select the other shape, fill it with R=142, G=198, B=64 , lower its Opacity to 30% and add 5px Gaussian Blur effect.
Now you need to mask these two shapes. First, group them (Command + G), then open the Transparency panel. Make a new copy of “vectors,” fill it with white and move it above this fresh group (in the Layers panel). Now select the shape and the group, open the fly-out menu of the Transparency panel and click on Make Opacity Mask. In the end, it should look like in the final image below.
Step 14
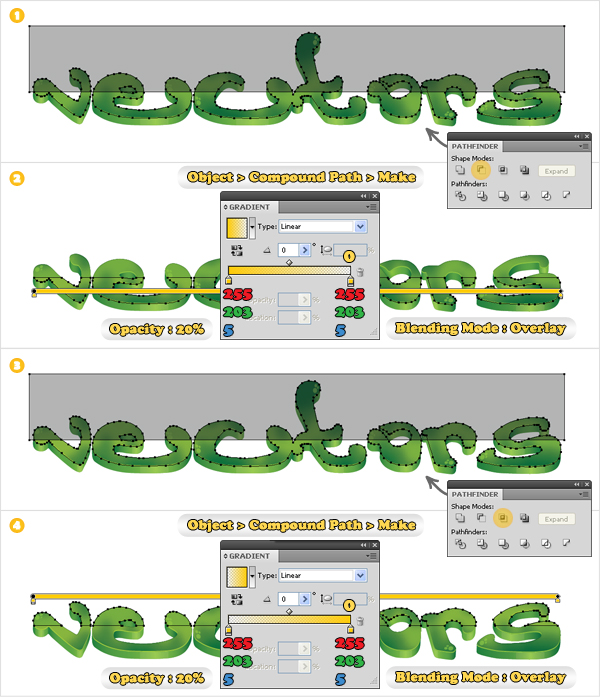
Make another two copies of “vectors,” then pick the Rectangle Tool (M). Create a shape like the one shown in the first image and duplicate it. Select one of the rectangles, along with one of the “vectors” copies, then click on the Minus Front button from the Pathfinder panel. Select the resulting shapes and go to Object > Compound Path > Make.
Fill this path with the linear gradient shown in the second image, lower its Opacity to 20%, then change its blending mode to Overlay. Select the other rectangle along with the “vectors,” copy and click on the Intersect button from the Pathfinder panel. Select the resulting shapes and go to Object > Compound Path > Make. Fill this new path with the linear gradient shown in the fourth image, lower its Opacity to 20%, then change its blending mode to Overlay.
Step 15
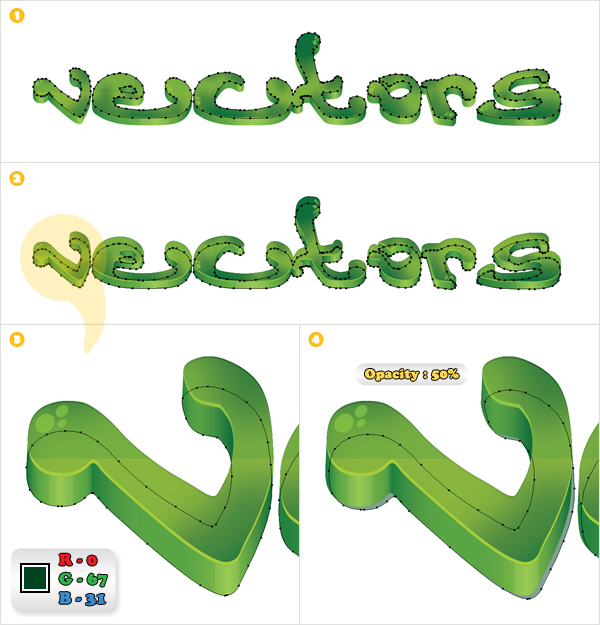
Make a new copy of “vectors.” Select it, Send it to Back (Shift + Command + Left Bracket key), place it as shown in the second image and rename it “vectors.back”. Change its fill color to R=0, G=67, B=31, then duplicate it. Select the copy, move it 1px down and to the right, then lower its Opacity to 50%.
Step 16
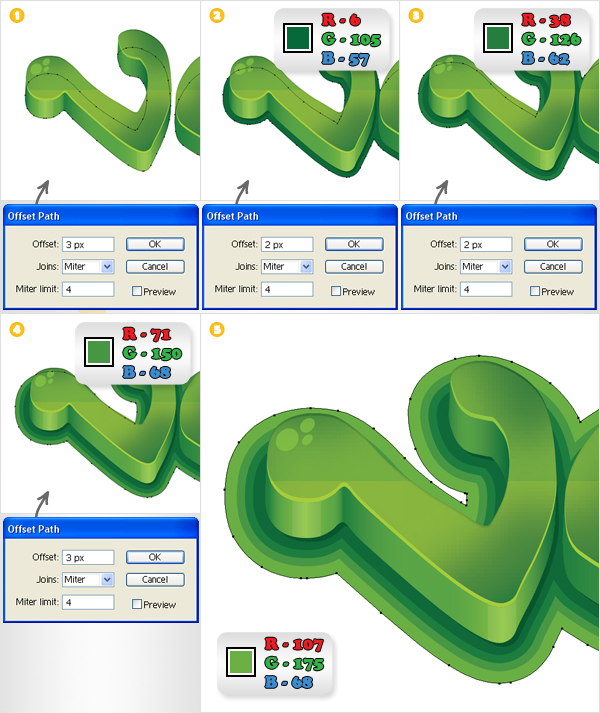
Reselect “vectors.back” and go to Object > Path > Offset Path. Enter a “3px” Offset and click OK. Select the resulting shape, fill it with R=6, G=105, B=57, and go again to Object > Path > Offset Path.
Enter a “2px” Offset and click OK. Select the resulting shape, fill it with R=38, G=126, B=62, and go once again to Object > Path > Offset Path. Enter a “2px” Offset and click OK.
Select the resulting shape, fill it with R=71, G=150, B=68, and go one more time to Object > Path > Offset Path. Enter a “3px” Offset and click OK. Fill the resulting shape with R=107, G=175, B=68.
Step 17
Select the original “vectors.back” shape and go to Effect > Blur > Gaussian Blur. Enter a 2x Radius and click OK.
Step 18
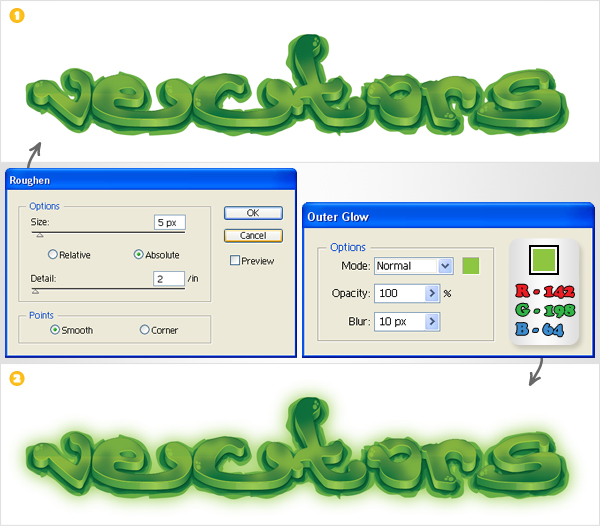
Select all the shapes made in the sixteenth step and go to Effect > Distort & Transform > Roughen. Enter the data shown below and click OK. Now select only the largest shape and go to Effect > Stylize > Outer Glow. Enter the data shown below and click OK.
Step 19
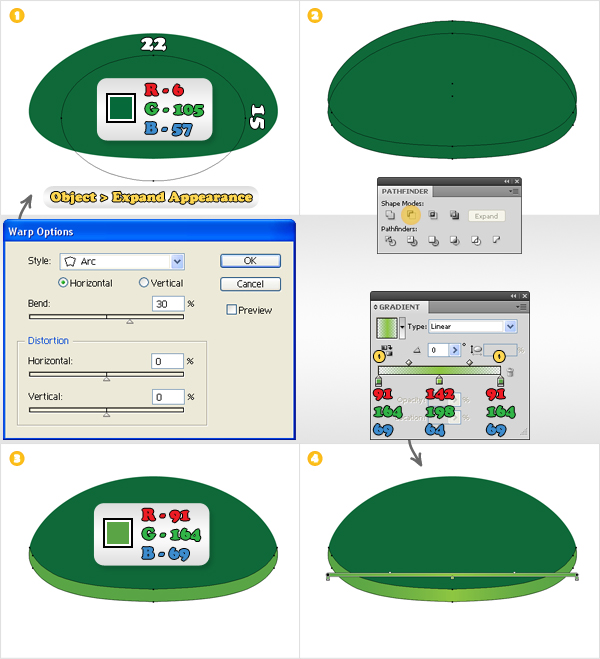
Pick the Ellipse Tool (L), create 22px by 15px shape, then fill it with R=6, G=105, B=57. Select this shape and go to Effect > Warp > Arc. Enter the data shown below, click OK, then go to Object > Expand Appearance. Make two copies of the resulting shape. Select the top copy and hit the up arrow three times (to move it 1,5px up).
Reselect both copies and click on the Minus Front button from the Pathfinder panel. Fill the resulting shape with R=91, G=164, B=69. Now add a second fill and use the linear gradient shown in the final image. Group these two shapes.
Step 20
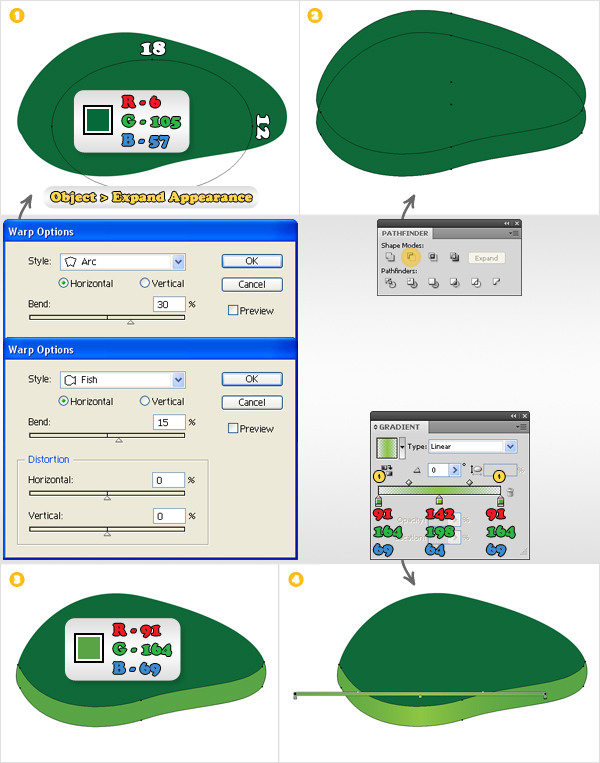
Pick the Ellipse Tool (L), create an 18px by 12px shape and fill it with R=6, G=105, B=57. Select this shape and go to Effect > Warp > Arc. Enter the data shown below, click OK, then go to Effect > Warp > Fish. Again, enter the data shown below, click OK, then go to Object > Expand Appearance. Make two copies of the resulting shape.
Select the top copy and hit the up arrow three times (to move it 1,5px up). Reselect both copies and click on the Minus Front button from the Pathfinder panel. Fill the resulting shape with R=91, G=164, B=69, then add a second fill and use the linear gradient shown in the final image. Group these two shapes.
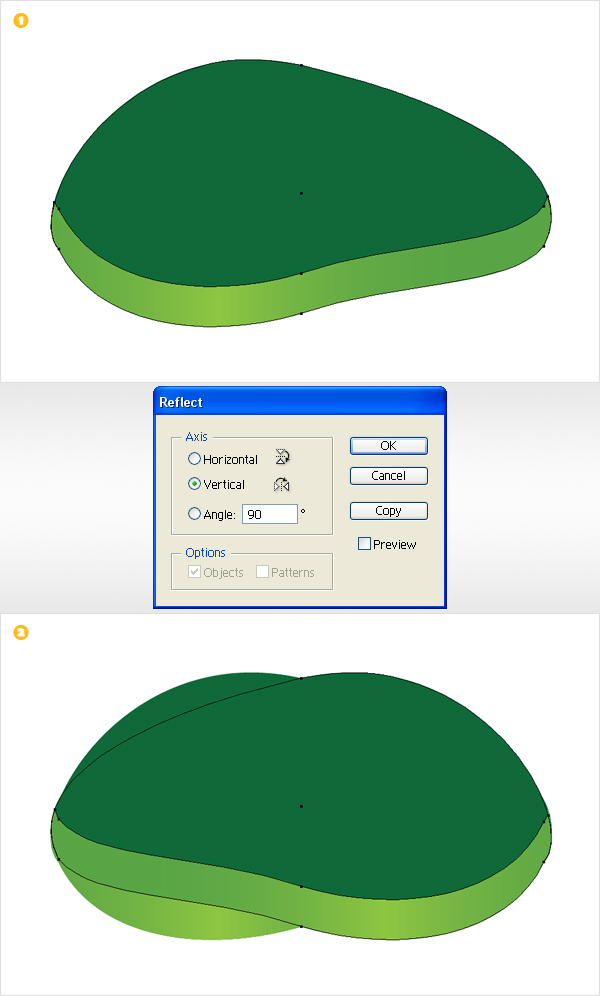
Step 21
Select the group made in the previous step and go to Effect > Distort & Transform > Reflect. Check the Vertical button, then click on the Copy button. This will create a horizontally flipped copy of your group.
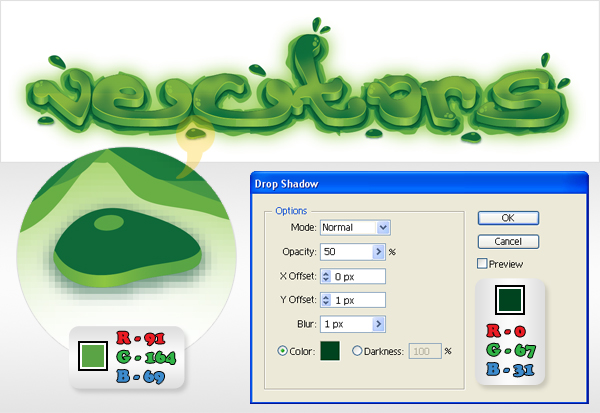
Step 22
Make some copies of the groups made in the previous three steps. Rotate, resize, then place these groups as shown in the following image. Add a discrete, squeezed circle for each of part of this group, and fill it with R=91, G=164, B=64. Finally, add a simple Drop Shadow effect (Effect > Stylize > Drop Shadow) for the bottom groups.
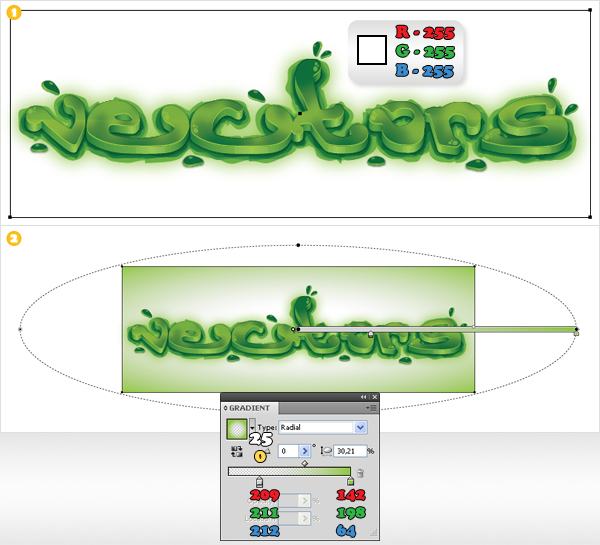
Step 23
For the background use the Rectangle Tool (M) to create a shape the size of your Artboard (700 by 300px). Fill it with white, then add a second fill and use the radial gradient shown in the second image. Again, take a closer look at the gradient. The yellow test stands for Opacity and the white text stands for Location.
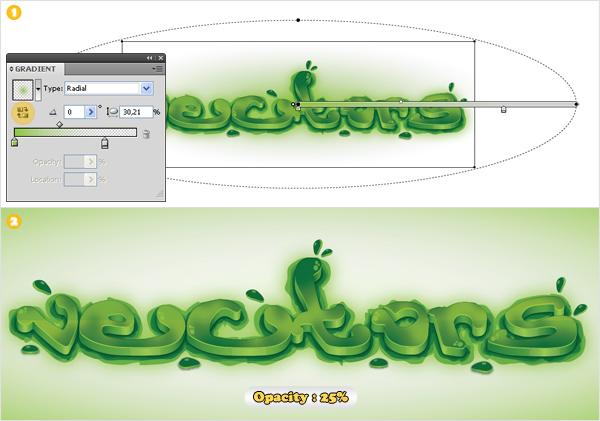
Step 24
Duplicate the rectangle made in the previous step. Select it, select the second fill (from the Appearance panel), then go to the Gradient panel and click on the Reverse Gradient button. Finally, reselect the entire path, lower its Opacity to 25%, and you’re done.
Conclusion
The final image is below.